Dimension Icon: Atomic Force Microscope (AFM)
|
Description
An AFM measures a sample's topographic and other surface information by interacting a nanoscale probe with the sample. The Dimension Icon offers three main interaction modes: (1) PeakForce Tapping Mode, which operates in conjunction with Bruker's ScanAsyst® to allow the software to automatically optimize several imaging parameters for high-quality, relatively easily-obtained images; with tapping oscillations of 0.25 to 2.0 kHz, it is also capable of capturing a force curve at each pixel in order to facilitate extraction of mechanical property data using the Quantitative NanoMechanics (QNM) software package; (2) Tapping Mode, a more traditional tapping interaction that operates near the probe cantilever's resonant frequency (usually 10s to 100s of kHz) to provide topographic and phase imaging; (3) Contact Mode, for direct, constant contact between the probe and surface, which is necessary for several other surface measurement techniques.
Applications
- Topographic imaging of surface features ranging from sub-nm to several microns in height
- Roughness measurements resulting from sub-nm Z resolution
- Phase imaging to qualitatively identify different phases of material by their surface properties
- Quantitative NanoMechanics (QNM) to extract material property data from force curves (e.g. elastic modulus, adhesion, energy dissipation)
- Piezoresponse Force Microscopy (PFM)
- Magnetic Force Microscopy (MFM) using Lift Mode
- Electrostatic Force Microscopy (EFM) using Lift Mode
- Surface Potential measurements
- Measurements in liquid environments are possible
- See Bruker's Scanning Probe Microscopy Techniques Poster
- The KNI does not currently have modules for Scanning Tunneling, TUNA & Conductive, Scanning Spreading Resistance, Scanning Capacitance, or Scanning Thermal modes; inquire with the MMRC at Caltech for access to some of these advanced techniques.
Resources
SOPs & Troubleshooting
- PeakForce Tapping & Tapping Mode SOPs (Short Version | Long Version)
- Troubleshooting Guide
Video Tutorials
- Basics of ScanAsyst & PeakForce Tapping Mode (video by Bruker)
- Aligning the Laser (video by Bruker)
Technical Notes
Presentations
- Bruker's presentation on Image Quality & PeakForce Tapping
- Bruker's presentation on Quantitative NanoMechanics (QNM)
Manufacturer Manuals
- Bruker Dimension Icon Instruction Manual (Scanning Software)
- Bruker NanoScope Analysis V150 Manual (Analysis Software)
Order Your Own Probes
- Probes are considered consumable items that users users are responsible for investigating and purchasing themselves. ScanAsyst-Air probes are commonly used with PeakForce Tapping Mode for topographic imaging, while the selection of Tapping Mode probes relies on a number of factors related to your sample. See Bruker's "Easy Product Wizard," for example, for some probe selection guidance.
Using Standard Samples
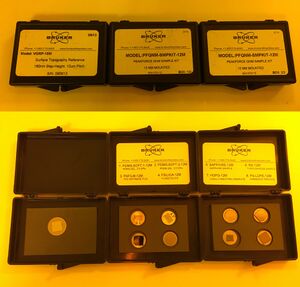
- Note that in order to troubleshoot scanning problems (e.g. to determine if the problem has to do with the sample, the probe, or the microscope itself), it can be helpful to scan a standard sample. The standards are located in a case underneath the AFM desk. These are the three most recommended standards; typically choose the one that is closest to your own sample:
- Surface Topography Reference: Features are 10x10 μm wide, 180 nm deep. This works well to check the accuracy and morphology of step heights, and is used to periodically recalibrate the Z dimension of the AFM scanner. Note that it does not necessarily do a good job predicting the behavior of scans that look at roughness on a scale that is an order-of-magnitude or two smaller (e.g. measuring 2D material step heights).
- SAPPHIRE-12M" Sample (#5 in PFQNM-SMPKIT-12M Box 2/2): Has an Rq roughness (aka RMS roughness) on the order of 1 nm. This can be used to check the microscope performance on very flat samples, e.g. 2D materials step heights or substrate roughness. Since this is a very hard sample, consider lowering your engage force setpoint to avoid blunting your tip upon making contact (e.g. to 0.03 V or lower for the Peakforce Engage Setpoint).
- RS-12M Titanium Roughness Sample (#6 in PFQNM-SMPKIT-12M Box 2/2): Has Rq roughness of about 30 nm and can be used generally to check that you are getting good topography scans on features ranging from 10s to 100s of nm.
Specifications
Manufacturer Specifications
AFM Specifications
- Minimum Feature Size Resolved, Z: ~0.1 nm
- Minimum Feature Size Resolved, X & Y: ~2 nm
- X & Y scan range: 90 μm x 90 μm
- Z scan range: up to 10 μm
- Z noise floor: <30 pm RMS in appropriate environment (imaging bandwidth up to 625 Hz)
- Z sensor noise level(closed-loop): 35 pm RMS (imaging bandwidth up to 625 Hz); 50 pm RMS force curve bandwidth (0.1 Hz to 5 kHz)
- X & Y position noise (closed-loop): ≤0.15 nm RMS (imaging bandwidth up to 625 Hz)
- X & Y position noise (open-loop): ≤0.10 nm RMS (imaging bandwidth up to 625 Hz)
- Integral nonlinearity (X-Y-Z): <0.5%
- Sample Size: ≤210 mm diameter, ≤15 mm thick
- Motorized position stage (X-Y axis): 180 mm × 150 mm inspectable area; 2 μm repeatability, unidirectional; 3 μm repeatability, bidirectional
- Microscope optics: 5-megapixel digital camera; 180 μm to 1465 μm viewing area; Digital zoom and motorized focus
Related Instrumentation in the KNI
Scanning Probe Microscopes
Sample Preparation for Microscopy
- Oxygen & Argon Plasma Cleaner (Tergeo Plus ICP- & CCP-RIE) to remove hydrocarbons from surface
- Carbon Evaporator (Leica EM ACE600) to make samples conductive
